-

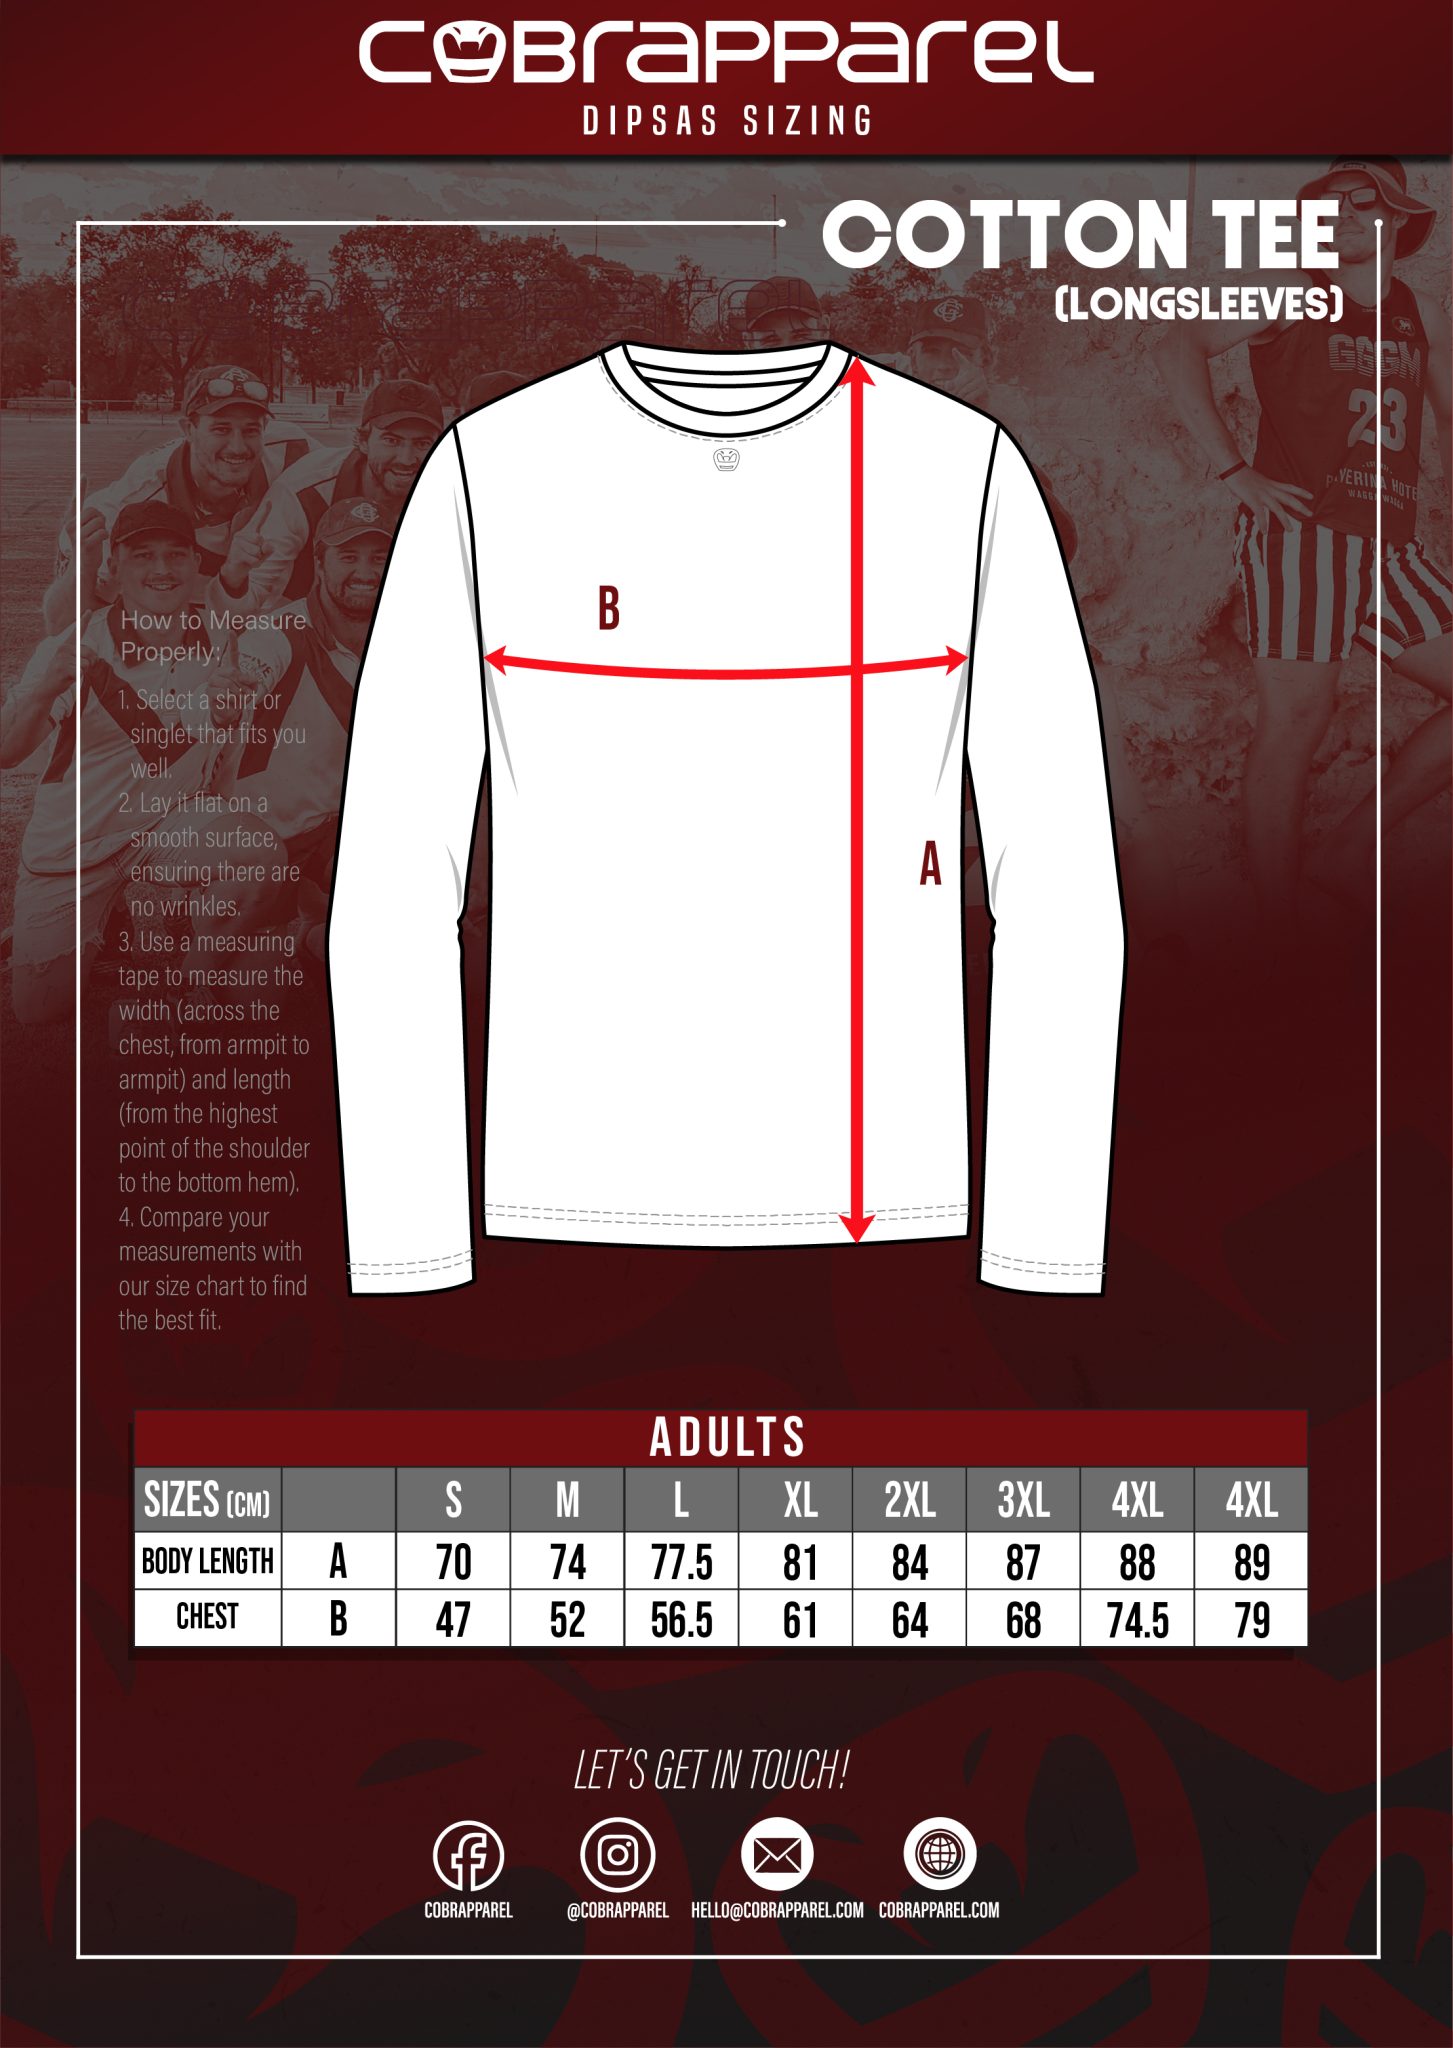
- Size Chart Long
-
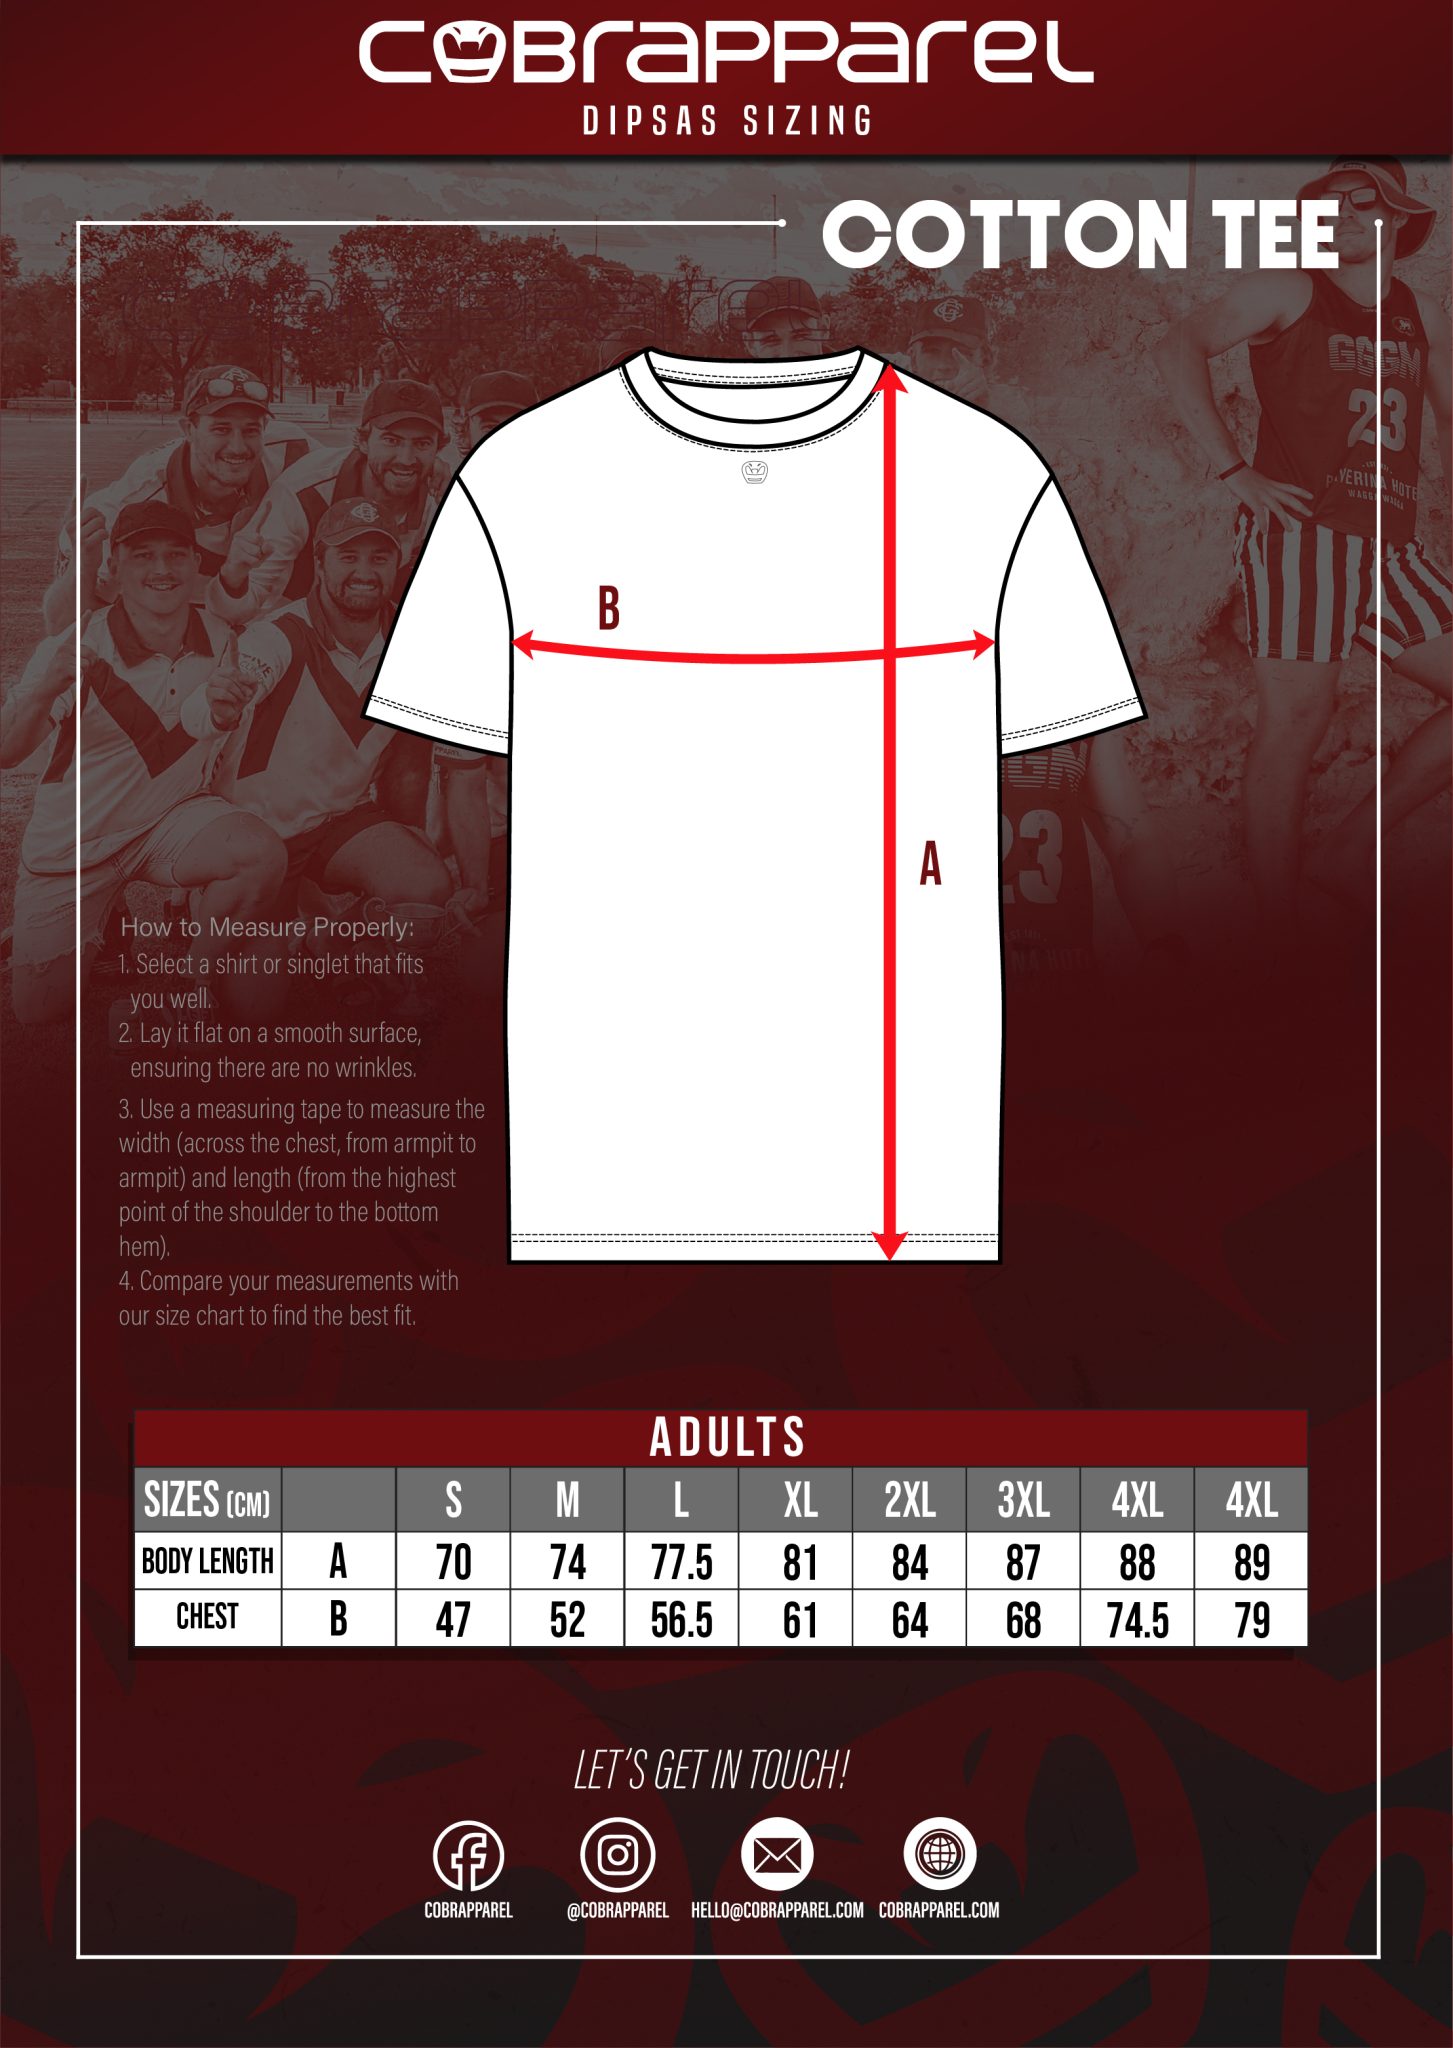
- Size Chart Short
Bucket hats have become an iconic fashion trend that effortlessly combines style and functionality. From their humble beginnings as practical headgear for fishermen and outdoor enthusiasts, they have now evolved into a versatile accessory that appeals to people of all ages and walks of life. The best part is that you don’t have to settle for store-bought designs when you can make your own custom bucket hats! In this comprehensive guide, we’ll take you through the step-by-step process of creating personalised bucket caps that reflect your unique taste and flair. Get ready to unleash your creativity and craft a hat that will make heads turn!
Before we dive into the crafting process, let’s gather all the necessary materials and tools:
Materials:
Selecting high quality fabric is crucial for the success of your bucket hat project. Consider the intended purpose and the season when you plan to wear caps. Light and breathable fabrics like cotton work well for warm weather, while denim or canvas can be great for a sturdier hat with a touch of vintage charm.
Now, let’s move on to how it is made. You can either use an existing bucket cap as a template or download a pattern online. Alternatively, you can create your own pattern by following these steps:
Step 1: Measure your head circumference: Use a measuring tape to determine the circumference of your head. Add an extra inch to this measurement to account for seam allowances and comfort.
Step 2: Calculate the radius: Divide the head circumference by 6.28 (2 x π). This will give you the radius of the circle you need to create for the crown of the hat.
Step 3: Create the crown pattern: Take a large piece of paper and mark the centre point using a pin. Attach a string to the pin, and using a pencil, draw a circle with a radius equal to the value you calculated earlier.
Step 4: Measure the brim length: Decide how wide you want your brim to be. A standard measurement is around 3 inches, but you can adjust it according to your preference. Add seam allowances to this measurement as well.
Step 5: Create the brim pattern: From the outer edge of the crown pattern, draw a larger circle with a radius equal to the brim length.
Step 6: Cut out the patterns: Cut out both the crown and brim patterns carefully. Now, you have your customisable bucket hat pattern ready!
With the pattern in hand, let’s start crafting your custom embroidered bucket hats:
Step 1: Prepare the fabric: Lay out your chosen fabric on a flat surface and fold it in half, right sides facing each other. Place the crown pattern on the fabric’s fold and secure it in place with pins. Do the same for the brim pattern, placing it on another double-folded fabric piece.
Step 2: Cut the fabric: Carefully cut around the patterns, leaving a seam allowance of about 1/4 to 1/2 inch. Ensure that you cut through both layers of fabric for the crown and brim.
Step 3: Fuse the interfacing (optional): For added structure and stability, you can apply fusible interfacing to the crown fabric before sewing. Simply follow the instructions on the interfacing packaging to iron it onto the wrong side of the fabric.
Step 4: Sew the crown: With the right sides facing each other, sew the sides of the crown together using a straight stitch on your sewing machine or by hand. Remember to leave the top open.
Step 5: Sew the brim: Following the same process as before, sew the sides of the brim together, leaving the outer edge open.
Step 6: Attach the brim to the crown: Pin the brim to the crown, aligning the edges carefully. Sew them together using a straight stitch, making sure to keep the seam as neat as possible.
Step 7: Finish the edges: To prevent fraying, zigzag stitch or squeeze the raw edges of the hat.
Step 8: Add grommets and chin straps (optional): If you want to add a touch of uniqueness to your bucket hat, consider installing grommets on either side of the crown and attaching chin straps. This step is entirely optional and can be omitted if you prefer a simpler design.
Congratulations on crafting your very own custom bucket hat! Through this step-by-step guide on how to make custom bucket hats, you’ve learned how to create a personalised accessory that not only complements your style but also reflects your creativity. Whether you choose to keep it classic or add a modern twist, your bucket hats are great statement pieces that set you apart from the crowd. Remember, practice makes perfect, so don’t hesitate to experiment with different fabrics, colours, and patterns to craft the perfect bucket hat that showcases your individuality. Happy crafting!
© 2026 Cobrapparel. All Rights Reserved. Website designed by Simple Pixels, Wagga Web Designers